Exchange 2007 to Exchange 2010 Upgrade / Transition / Migration | ||
Problem | ||
I recently posted an article on Exchange 2003 to 2010 Transition, Only to be asked, "Can you do the same for Exchange 2007 to 2010?", so here it is :)
Before we start, I'm aware "Migration", "Swing Migration", and "Transition" have three very different meanings, Depending on which KB, blog or piece of Microsoft documentation you are reading. Be under no illusions the terminology, used in the title and the tags on this page is to catch the web traffic of those, who have an Exchange 2007 Server and want to move all their Exchange, to Exchange 2010 server.
| ||
Solution | ||
In this Example I've got an Exchange 2007 Server running on Server 2003 R2 x64. My new server will run Server 2008 with Exchange 2010.
Just for a "worst case scenario" I've put in some public folders and I've got some Outlook 2003 clients.
Step 1 - "Pre-Site Visit"
1. Make sure before you start, you have the Exchange 2010 media and unlock code, youdon't want to download the media on a site with a slow internet connection, (at time of writing the disk image is 1GB in size).
2. If your existing domain controllers are all x32, and you are also upgrading domain controllers, during the process, Then you will be extending the domain schema (i.e. it's not 2003 R2 or 2008) then make sure you have x32 bit Windows media with you (Note: 2003 and 2008 R1 only, as 2008 R2 is all x64 bit).
3. You domain and forest functional levels need to be (at least) Windows Server 2003, before you start the migration.
4. Make sure any third party anti virus and/or mail scanning software is supported and will work on Exchange 2010, and you have the media and licences handy.
5. You will need to install on a x64 bit server, make sure you have a server capable, and Windows x64 bit media with licences.
6. Before you even think about going further make sure you have a good backup! If you are lucky enough to have VMware ESX, Hyper-V or another virtualisation platform, consider doing a P2V conversion on your Exchange 2007 server then simply turning the 2007 Server off, then if it all goes to hell in a hand cart simply turn the original server back on again.
6. While your thinking about backups - does your backup software support Exchange 2010? you might need a new Exchange agent, check with your software reseller.
Step 2 - "Pre Install"
1. Before you do anything, it's time for a common sense check, make sure your existing Exchange 2007 Organisation is happy and running cleanly, and has good communication with the domain and DNS. Get in the event logs and make sure it's a happy server.
Time spent on reconnaissance is seldom wasted!

2. Now you THINK Exchange is happy, it's time to MAKE SURE, launch the Exchange 2007 Management Console and select Tools > Best Practice Analyser
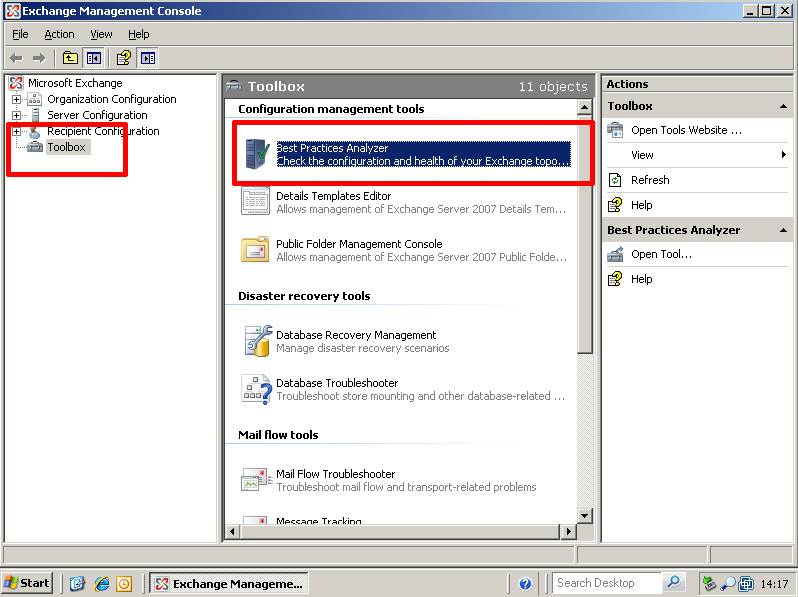
Run a "Health check", and an "Exchange 2007 Readiness check". (At time of writing there is no 2010 option).
  Build NumbersExchange 2007 RTM Version 8.0.685.24 OR 8.0.685.25Exchange 2007 SP1 Version 8.1.(Build 240.6) Exchange 2007 SP2 Version 8.2 (Build 176.2) Exchange 2007 SP3 Version 8.3 (Build 83.6) To find your Exchange 2007 service pack level compare your build number with the build numbers above. Note you may need to install Windows Installer 4.5 before you can install SP2, (this requires a reboot). 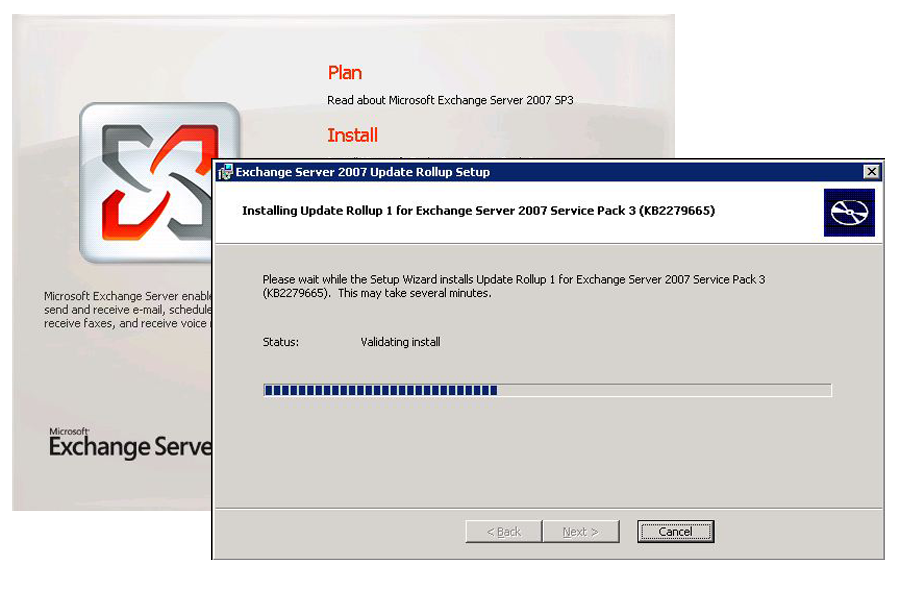
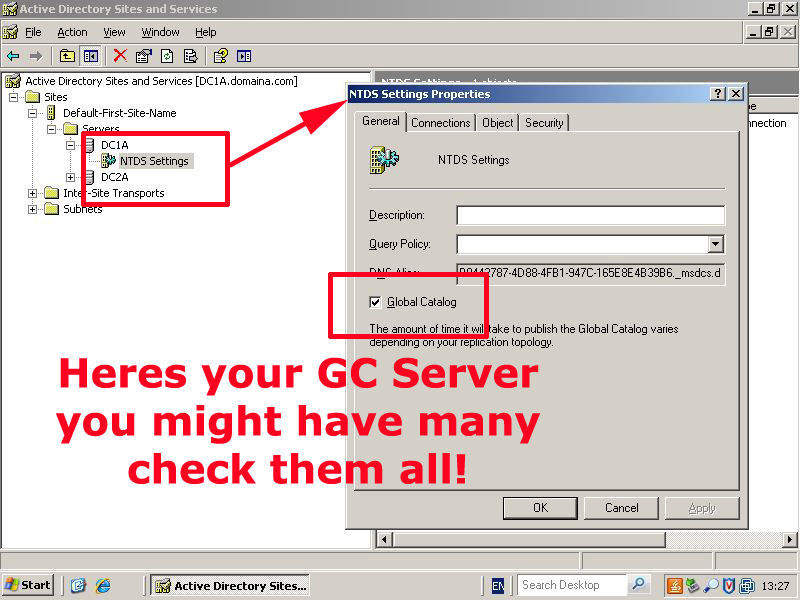
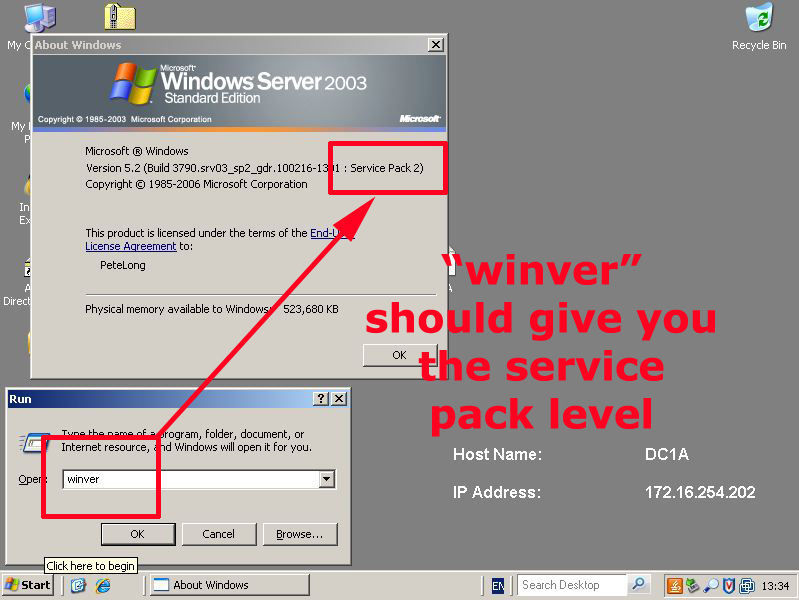
4. The brief says your Global Catalog server should be at at least Server 2003 SP2, however I'd be updating all the domain 2003 controllers to Service Pack 2. (Note: you need 381Mb free space on the system drive, plus 170MB additional free space to install SP2).
Locate the Global Catalog Server
Find the Service Pack Level
 Step 3 - "Deploy Exchange 2010"1. Build you new x64 bit Windows server and apply all the relevant updates and service packs etc. The new server needs the Office 2010 Filter Pack Installing CLICK HERE.
2. You need to add certain roles to the new server before attempting to install Exchange 2010 you can script that though I prefer to do things myself. Start > Server Manger > Roles > Add Roles > Next > Select Web Server (IIS) > Next > Next.

3. On Role Services, under security > tick Basic Authentication > tick Windows Authentication > Tick Digest Authentication > Under Performance tick Dynamic Content Compression.
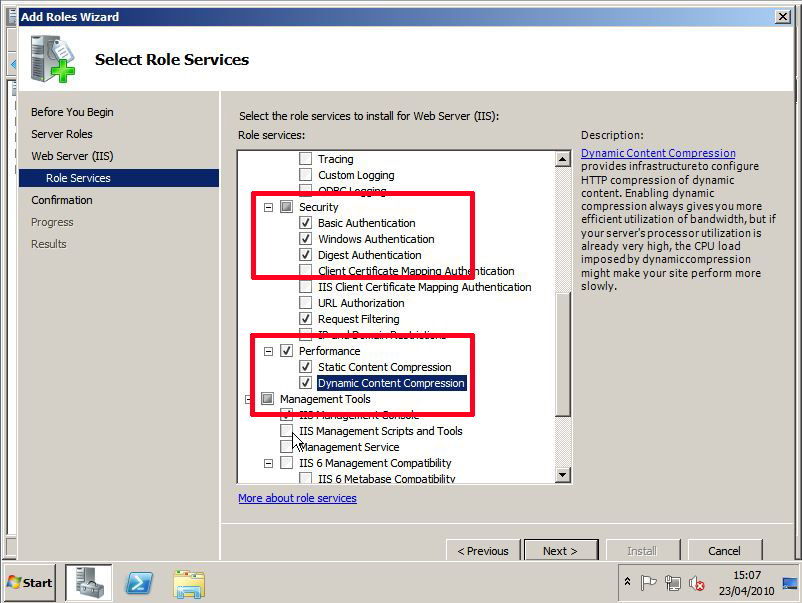
4. Under Management Tools > Select IIS6 Management Comparability > Next > Install > Close (when finished).

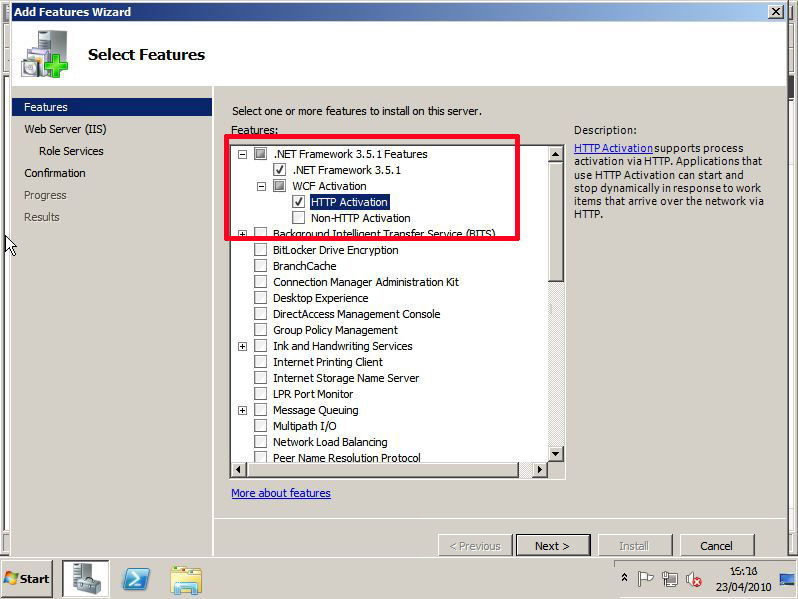
5. Now you need to add "Server Features", primarily .Net Framework 3.5 that is in Server Manager > Features > Add Features > Expand .NET Framework 3.5.1 Features > Expand WCF Activation > tick HTTP Activation > Select to add Required Role Services.
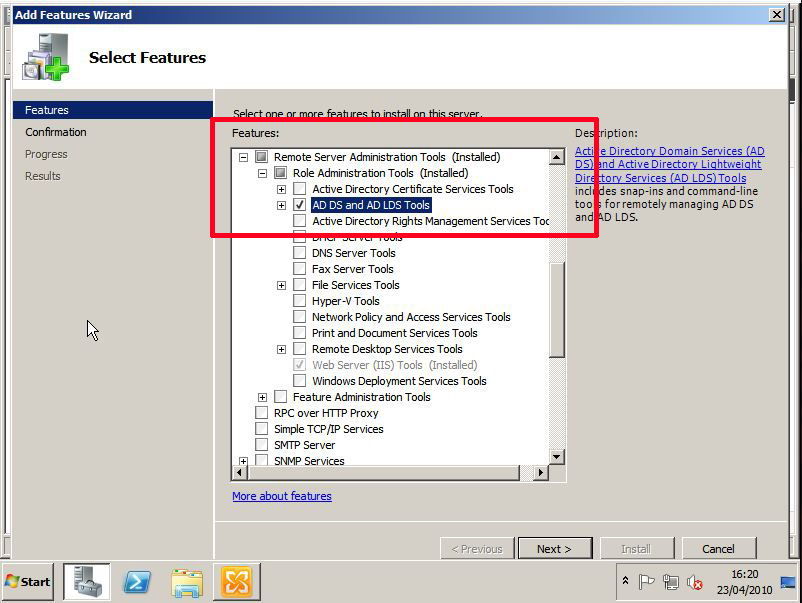
6. Scroll down and below "Remote Server Administration Tools" > Role Administration Tools > Select "AD DS and AD LDS Tools" > Next > Next > Next > Install > Close (when finished) > You may be asked to reboot.
Note: If you are installing on a domain controller (Which is NOT recommended), the "AD DS and LDS tools" will already be installed.
7. Post reboot the process will finish.
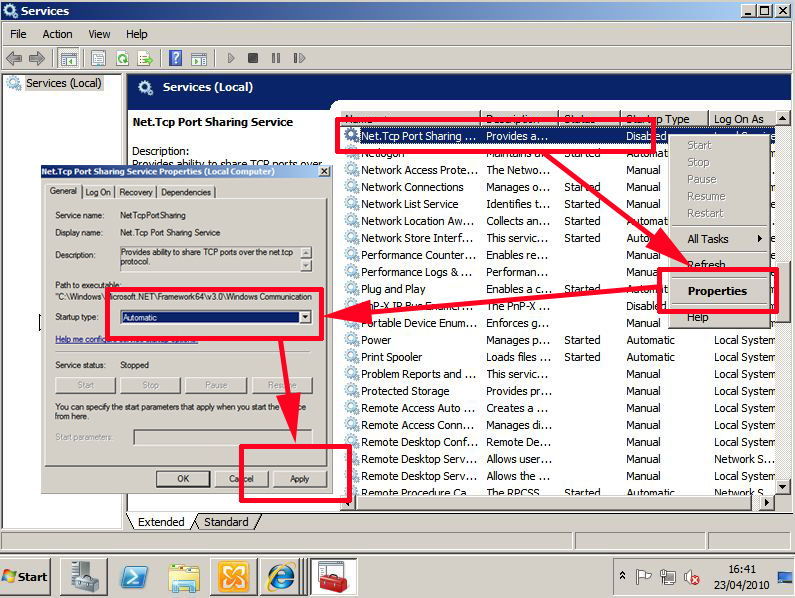
8. You need to set the startup type of the "Net Tcp Port Sharing" service to automatic > Click start > Run > Services.msc {enter} > Locate the Net Tcp Port Sharing Service and set its startup type to automatic.
Note: If you don't see this service then you probably didn't complete the reboot in the previous step.
The following steps are not actually required (they should be done by the actual install), BUT, on more than one occasion I've seen the setup fail and I've had to run these commands manually, so not I do them as a matter of routine.
9. Open a command windows and either navigate to the folder containing the Exchange 2010 setup files (Or the DVD) and issue the following command:
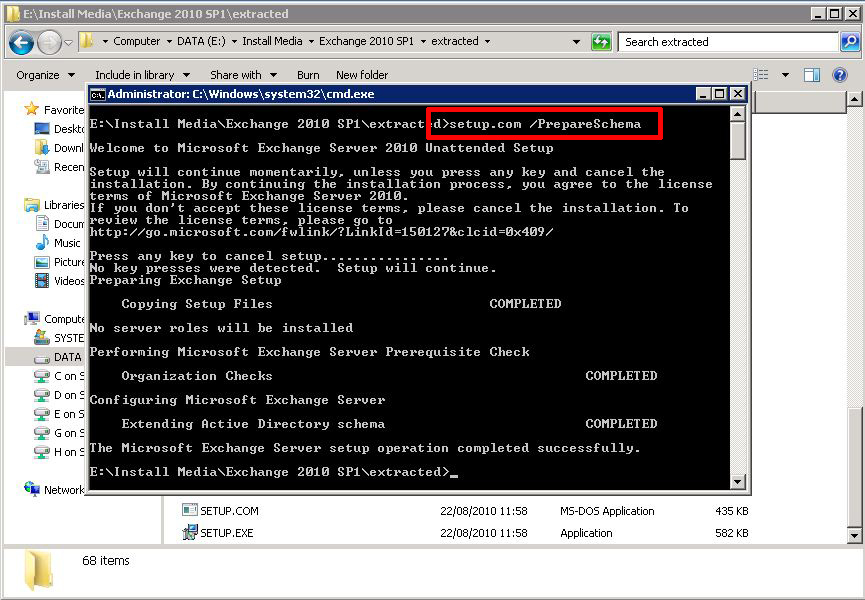
10. While still at command issue the following command:

11. While still at command issue the following command:
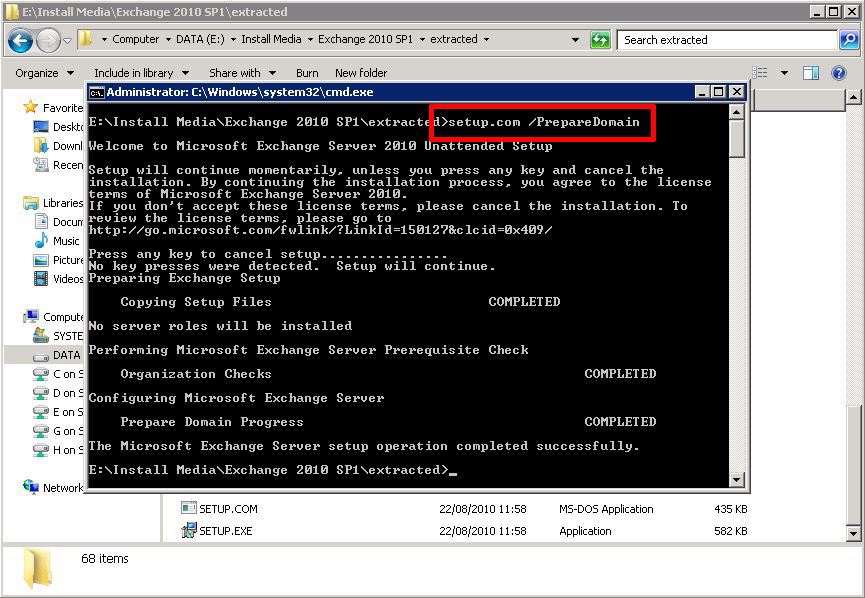
10. Put in the Exchange 2010 DVD, or navigate the folder containing the setup files. Run setup.exe, If you are using the multi language version you should be at "Step 3: Choose Exchange Language option" > Select it. > Select Install Languages from DVD.

11. Select "Step 4: Install Microsoft Exchange" > Files will extract and setup will Start.

12. At the Introduction screen > Next.

13. Accept the EULA > Next.

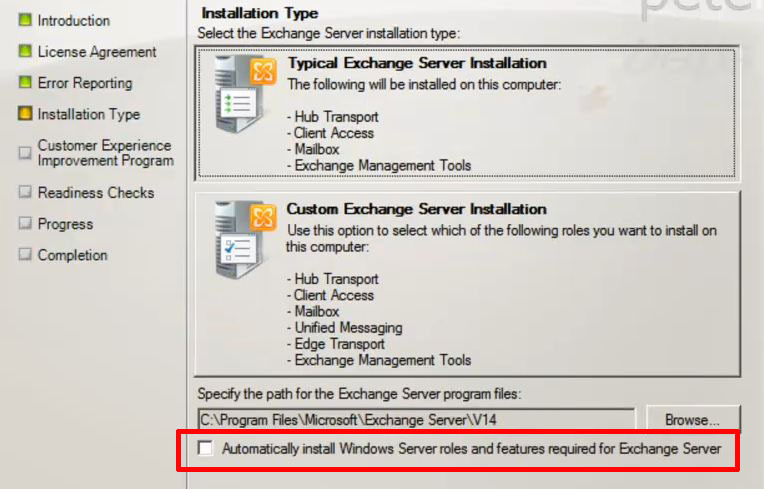
14. No, we don't want to do error reporting > Next > Select "Typical" > (If you installing with SP1 see the note below) > Next.

*****Update 18/03/11*****
If you are deploying Exchange 2010 with SP1 included, at this point select "Automatically install Windows Server roles and features required for Exchange Server"
15. If this is the only one, or it going to be your main "Bridgehead Server" then it will be internet facing > tick the box > enter your full domain name > Next

16. No we don't want to join the CEIP > Next > Exchange will perform a series of readiness checks > when finished click Install.

17. When done, click Finish > And the Exchange Management Console will Launch > To enter the Product Key, select "Server Configuration > Select the server > Select Enter Product Key. Then either restart the Exchange information store service or reboot.
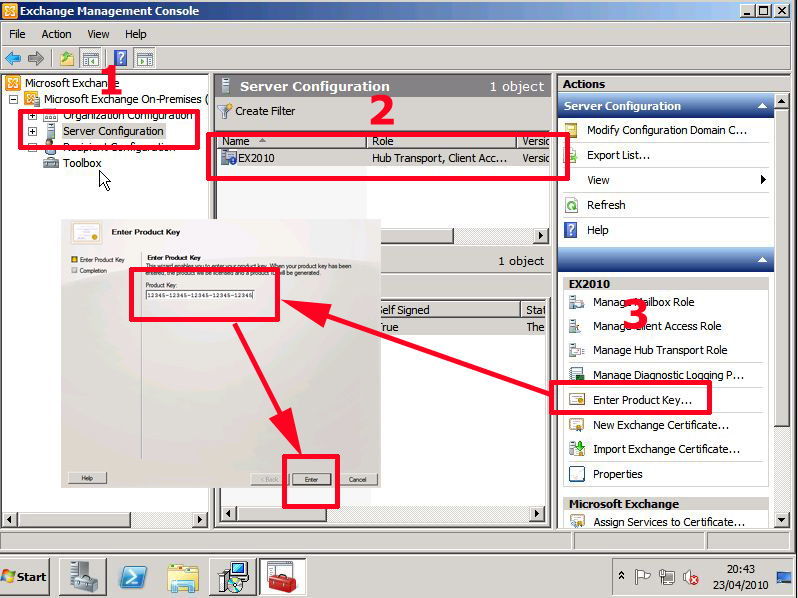
At this point don't expect each server to show up in the others Exchange Management Console
Step 4 - "Configure and Migrate"1. First I'm going to create a public folder database, and replicate the public folders form Exchange 2007 into it, Go to the Exchange Management console on the 2010 server. > Expand "Organisation Configuration > Mailbox > Database Management tab > "New Public Folder Database. > Give the database a a name and choose the NEW server to host it > Next > New > Finish.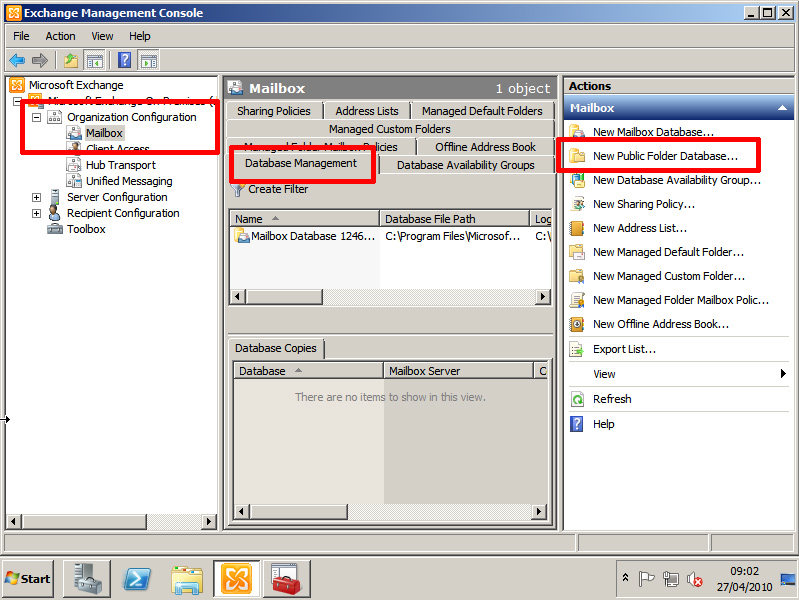
Then you need to make the new public folder database, the default one for the mailbox database > right click the mailbox database > Properties > Client Settings > Browse > Select the new one > OK > Apply.
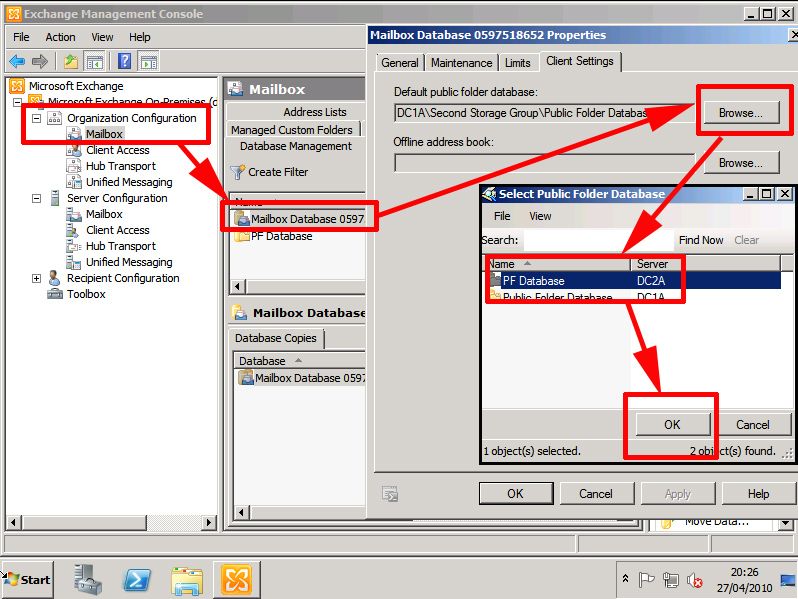
2. The next step is to set up a replica of your public folders in the new database, to do this use the Toolbox > Public Folder Management console.

3. Now Exchange 2010 has its own public folder database it connects to that by default, Right click "Public Folders" > Select "Connect to Server" > Browse to the OLD server.
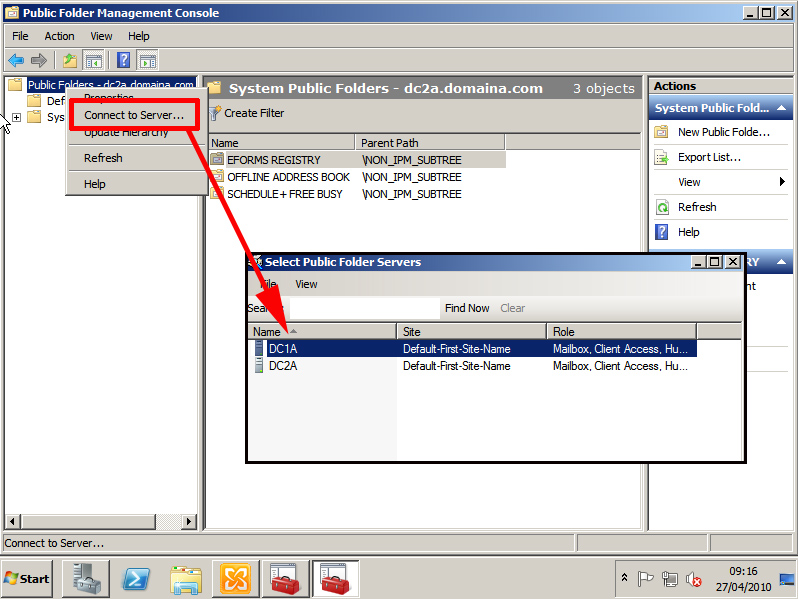
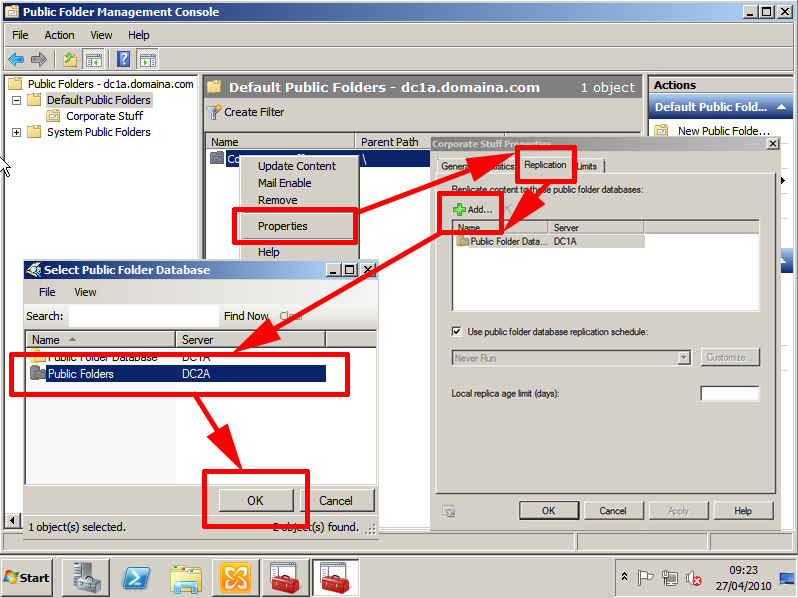
4. Select > Default Public Folders > The public folders should show in the middle screen > Right click the first one and select properties > replication tab > Add > Add in the NEWserver > OK > You can un-tick the "Use public folder data store replication schedule" and change the drop down to "Always run" if you wish > Apply > OK.
5. If you have any Outlook 2003 clients you need to replicate the "SCHEDULE+ FREE BUSY" public folder > This is under "System Public Folders" > Select it and you will see the folder in the centre view, create a replica on the NEW server as in the above step.

Replication is a LOT faster than it used to be, within a few hours it should be complete, occasionally it stalls, if that that happens right click "Public Folders" and select "Update-Hierarchy" or In the Exchange Management shell issue the following command.
Update-PublicFolderHierarchy -Server {Exchange2007 Servername}

6. At this point you need to change the SMTP feed from the old Exchange 2007 box to the new Exchange 2010 Server, how you do this depends on your network setup, some examples of how you might do this are,
i. Change the SMTP (TCP Port 25) Port redirect on your router/firewall address
ii. Swap IP addresses from the old to the new server. iii. Change the translation from public to private IP address to point to the new IP.
Note: If you have any mail scanning servers, anti spam hardware devices etc, then they will also need changing to point to the new server.
7. You will need to add the NEW server to the exchange organisations send connector, from within the Exchange Management Console > Organisation Configuration > Hub Transport > Send Connectors > Right click your send connector (yours may have a different name) > Properties > Source Server > Add > Add in the NEW server > Apply.
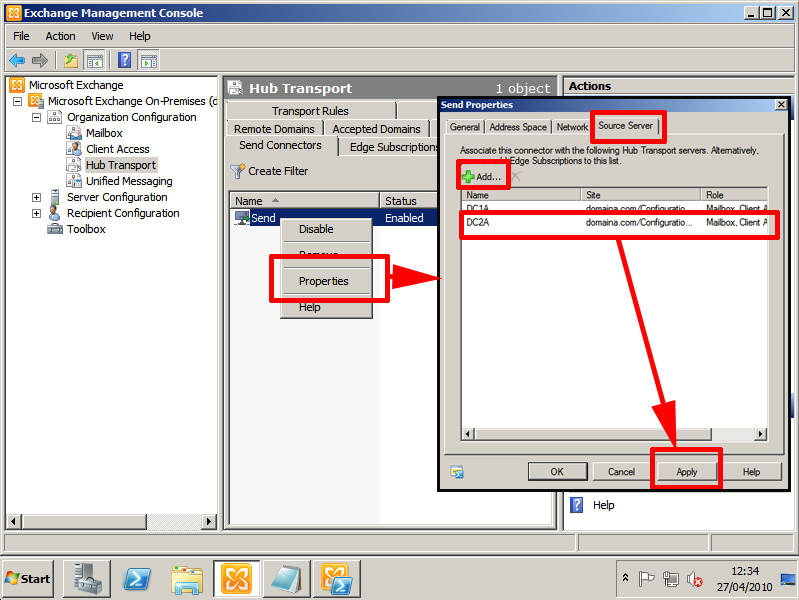
Then test mail flow works once again, this time through the new server.
8. Now you can start moving mailboxes from the old server to the new one, what I tend to do is move one mailbox, test mail flow outbound/inbound, then test mail flow internally from the mailbox I've just moved, to a mailbox that's still on the old server. Once I've proved this works I will move the rest of the mailbox's.
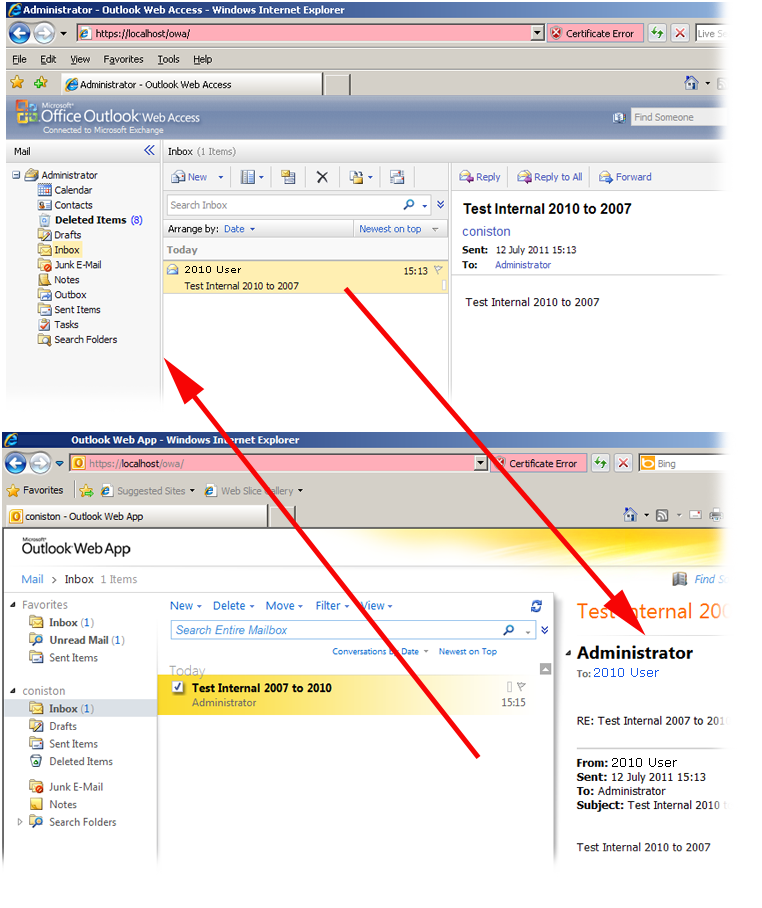
To move a mailbox, open the exchange 2010 management console, expand "Recipient Configuration" > Select Mailbox > You should see all the mailbox's listed > Right click the mailbox you want to move > Select "New Local Move Request".

At the introduction screen, hit the browse button and select your new servers data store > Next > Next > New > Finish.

Once you have moved one and tested, it you can move the rest of the mailbox's.
Note: Outlook 2003 cannot connect to Exchange 2010, you need to turn on encryption before it will work. In Outlook Tools >Email Accounts > View or Change > Select the Exchange account > Change > More Settings > Security > Tick "Encrypt data between Microsoft Office Outlook and Microsoft Exchange Server > Apply > Restart Outlook.
 To disable Encryption for ALL Exchange 2010 connections
Issue the following powershell command in the Exchange 2010 Management Shell.
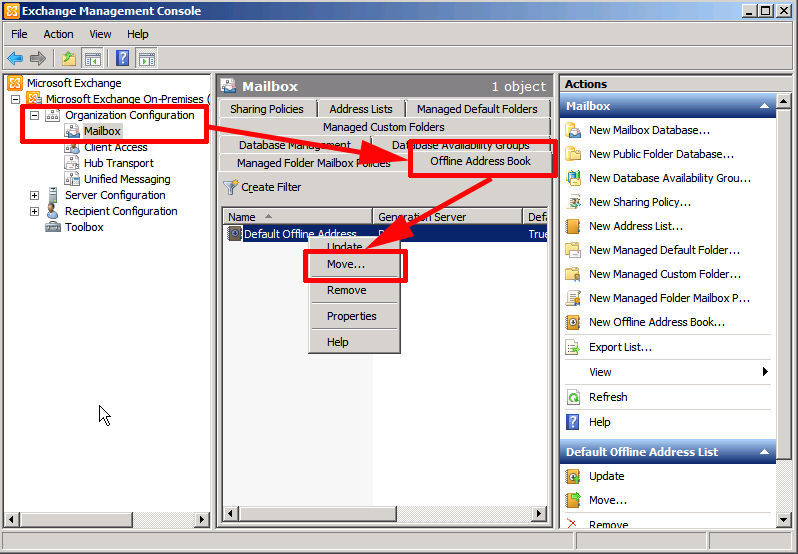
9. Next task is to change the server responsible for generating the offline address book. On the Exchange 2010 server Exchange Management Console, Expand "Organization Configuration" > Mailbox > Select the "Offline Address Book" tab > Right click the Default Offline address book and select "Move" > Browse > Select the new server > OK > Move > Finish.
10. Now you will need to change your backups to include the new data stores. Your backup software will probably require you install the Microsoft Exchange Server MAPI Client and Collaboration Data Objects before it can back up the datastores correctly, before you install the backup agents (ARCserve and Symantec Backup Exec for example). Download the CDO Objects here.
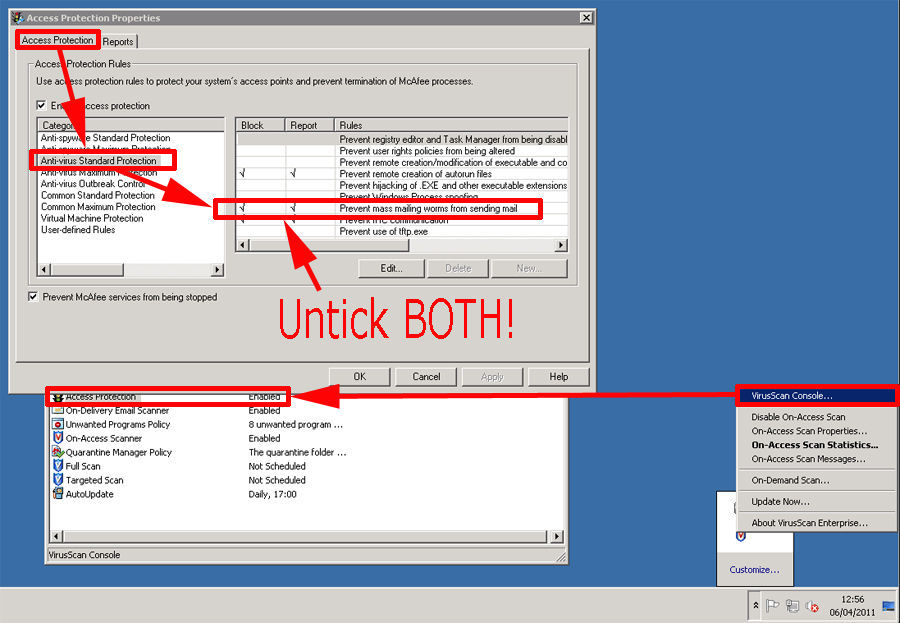
11. Be aware: some AV software (McAfee for example) likes to block TCP port 25 (SMTP), this is not good on an Exchange server! don't forget to disable this feature or you may have mail flow issues.
12. Still on the subject of AV, Make sure the folders that contain the Exchange Databases and Logs are EXCLUDED from the AV scans. (If not. your Exchange Server can break if your AV decides to quarantine a log file for example). You should have Exchange aware Backup solutions anyway, e.g. McAfee GroupShield, Trend ScanMail, etc.
Step 5 - "Do Nothing"
1. Now I would wait, If you have any Outlook 2003 clients they will need to log on and get redirected to the new exchange server for their mail - this happens seamlessly in the background as long as the old server is still on, (though I have seen it fail and need to be manually changed on a handful of client machines).
Note: By
Step 6 - "Decommission and remove Exchange 2007"
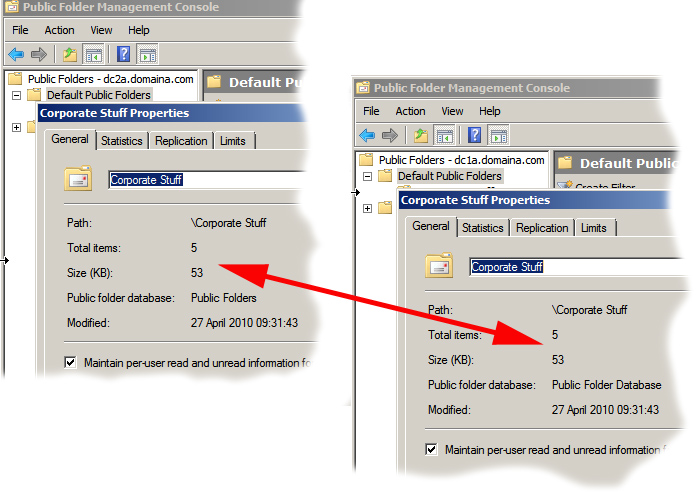
1. First check your Public folders are in sync. Connect to each server and compare the size and item count, don't forget to also check the SHEDULE+ FREE/BUSY folder if you set that to replicate.
Remove the replicas from the original server.

2. Now I would delete the mailbox database(s) from the old server.

Then the Public Folder Database.

IF YOU SEE THIS ERROR

Click HERE
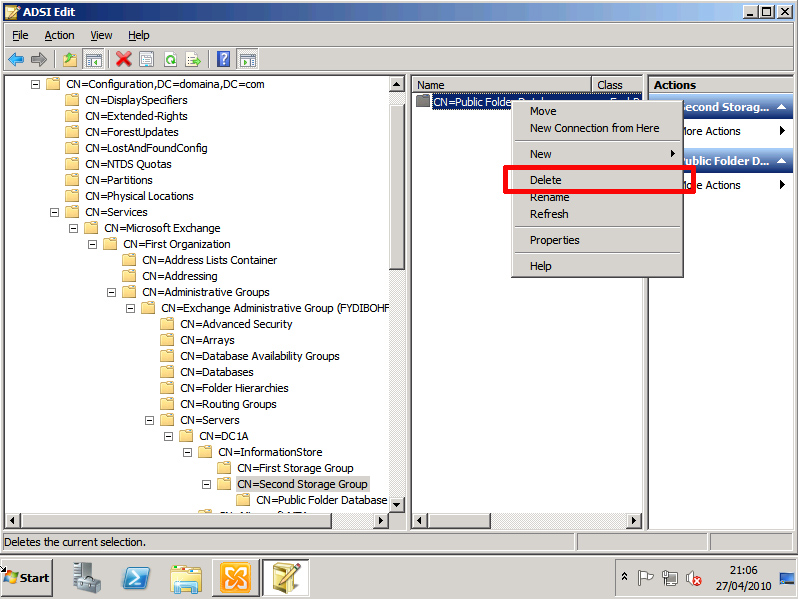
or in EXTREME situations (sometimes it refuses to delete no matter what you do) run ADSIedit and remove it from CN=Configuration,CN=Services, CN=Microsoft Exchange, CN={organisation name i.e First Organisation}, CN=Administrative Groups, CN={Administrative Group name}, CN=Servers, CN={servername}, CN=Information Store, CN={Storage Group Name}, CN={Public Folder Database Name} THEN REBOOT
3. You now need to remove the old server from the source server list on the organisation send connector.

4. In control panel go to add remove programs and select Exchange Server 2007 > Next > Untick all the roles > Untick Management Tools > Next.

The server will run thorough its readiness checks > Uninstall > Finish.
 | ||
16 Aralık 2012 Pazar
Exchange 2007 to Exchange 2010 Upgrade / Transition / Migration

10 Aralık 2012 Pazartesi
Hyper-v Failover Cluster ve Live Migration Nasıl Yapılır?
Hyper-v Failover Cluster ve Live Migration Nasıl Yapılır?
Bu yazıda HyperV Failover Cluster yapısını inceleyeceğiz. Kısaca Failover Cluster yapısı, aktif olarak çalışan her iki HyperV sunucusundan biri, bir sebepten dolayı hizmet verememeye başlarsa, çalışan diğer HyperV sunucusunun rolleri kendi üzerine alması, yani HyperV hizmetinin durmaması anlamına gelmektedir. İş sürekliliği açısından önemli olan bu yapıyı adım adım inceliyor olacağız.
Failover Cluster (HyperV) yapısı için yapıda bulunması gerekenler/Ön hazırlıklar;
- Aktif olarak çalışan bir Active Directory hizmeti,
- Failover Cluster hizmeti verecek en az iki adet HyperV rolü kurulu sunucu,
- Active Directory, HyperV sunucuları ve Storage arasındaki network bağlantısının düzgün çalışıyor, erişilebilir durumda olmaları,
- Failover Cluster hizmeti verecek HyperV sunucularının domain ‘e katılmış olmaları,
Tüm bu ön hazırlıklar tamamlandıktan sonra, HyperV kurulu Failover Cluster sunucularımda, Storage yapısının görebilmeleri ve erişilebilmeleri için gerekli olan iSCSI Initiator yapılandırmasını yapacağız.
“Start – Administrative Tools – iSCSI Initiator” seçin.

Resim-1
Microsoft iSCSI servisinin şu an çalışmadığını, çalıştırmak isteyip istemediğinizi soracaktır. “Yes” dedikten sonra devam edin.

Resim-2
Açılan pencerede, Storage ünitesinin IP Adresini yazdıktan sonra, “Quick Connect” butonuna tıkladığınızda, daha önceden hazırlamış olduğunuz “Target” a bağlı olduğunuzu göreceksiniz. “Done” butonuna tıklayarak işlemi tamamlayın.

Resim-3
Ardından “Server Manager” içerisinden “Storage – Disk Management” altında gelerek, biri 500 MB diğeri ise 30 GB olan disklerinizi görüntüleyin. Her iki diski de “Offline” durumdan “Online” duruma ve İnitialize ediyoruz. Tüm bu işlemlerden sonra, her iki diski de NTFS dosya sistemi ile formatlayın. İsimlerini ve drive letter ‘larını dilediğiniz gibi verebilirsiniz.

Resim-4
Formatladıktan sonra disk yapıları aşağıdaki gibi olmalı.

Resim-5
Disk Management ‘taki işimiz bitti. Yine sunucu üzerindeki iSCSI Initiator ‘a açın ve “Volumes and Devices” sekmesine gelin. Burada “Auto Configure” butonuna tıkladığınızda az önce formatlayıp, yapılandırdığınız diskler listelenecektir.

Resim-6
İlk Failover Cluster olan node ‘mda bu işlemleri tamamladık. İkinci HyperV Failover Cluster Node ‘una geçip, aynı iSCSI konfigürasyonlarını yapın. iSCSI ayarları sonrası, “Server Manager” içerisindeki “Disk Management” a geçerek, her iki diski de “Offline” durumdan “Online” duruma getirin.Ancak ilk node ‘da yaptığımız formatlama işlemini burada yapmıyoruz. Sebebi, Node1 HyperV sunucumdan Storage ‘a bağlanarak işlemleri yapmış olmam. Dolayısı ile formatlama işlemini tek bir sunucudan yapmanız yeterli olacaktır. “Volumes and Devices” sekmesinden “Auto Configure” butonuna tıklamayı unutmayın.

Resim-7
Disk konfigürasyonları tamamlandıktan ve her iki HyperV node ‘u da diskleri tanıdıktan sonra, sıra geldi Failover Clustering yapısını kurup/konfigüre etmeye. Her iki HyperV yüklü Node ‘larınızda “Server Manager – Features – Add Feature” sekmelerini seçerek, “Failover Clustering” bileşenini kurun.

Resim-8
HyperV Cluster Node1 ve Node2 ‘ye Failover Clustering bileşenlerini kurduktan sonra, sıra geldi varolan konfigürasyonu test etmeye. Test sonucu, hazırladığımız yapının, Failover Clustering yapısına uygun olup, olmadığı hakkında rapor hazırlanır. Varsa eksikleri detaylı şekilde görebilir, gerekli düzeltmeleri yaparak Failover Clustering hizmetlerini kullanmaya başlayabilirsiniz.
Konfigürasyon test işlemlerini herhangi bir HyperV Node ‘u üzerinden yapabilirsiniz. Ben konfigürasyonun doğruluğunu test etmek için, HyperV Node1 sunucusunu seçiyorum. HyperV Node1 sunucusunda Start – Administrative Tools – Failover Cluster Manager arayüzünü açtıktan sonra, sağ alt kısımda yer alan “Validate a configuration” linkine tıklayarak testi başlatıyorum.

Resim-9
Ardından açılan pencerede HyperV Cluster olacak her iki node ‘umu da “Browse” butonuna tıklayarak ekliyorum.

Resim-10
Sistem, ağ ve depolamaya ait tüm detayları test etmesi için “Run all tests” seçip, devam ediyorum.

Resim-11
Tüm konfigürasyonların uygunluğu test edildikten sonra, aşağıdaki görselde görebileceğiniz gibi bir rapor hazırlanır.

Resim-12
“View Report” butonuna tıklayarak hangi konfigürasyonların testten geçip, geçmediğini görebilirsiniz.
Failover Clustering yapısı için, tüm yapılan Sistem, Ağ ve Depolama konfigürasyonları doğru ise, Cluster kurulumuna geçebiliriz artık. Aynı pencere içerisinde bu sefer “Create a Cluster” linkine tıklayarak başlıyoruz.

Resim-13
Failover Cluster yapısına dahil olacak her iki node ‘umu da “Browse” butonuna tıklayarak seçiyorum.

Resim-14
Seçtikten sonra, kuracağımız Cluster yapısına bir isim vereceğiz. HyperV Cluster yaptığımız için, ben “HyperV_Cluster” adını verdim. Sonrasında ise, alttaki sütundaki son oktete Cluster ‘ınızın kullanacağı IP adresini yazacağız. Bu IP adresi daha önceden kullanılmamış, ve boşta bir adres olmalıdır.

Resim-15
Ardınran Cluster bilgilerini doğruladıktan sonra, Next butonuna tıklayarak Cluster yapısını oluşturmaya başlıyoruz.

Resim-16
İşlem başarılı bir şekilde tamamlandı, sıra geldi diğer detayları konfigüre etmeye.

Resim-17
Failover Cluster ekranı bu işlemden sonra aşağıdaki gibi gözükmelidir.

Resim-18
Failover içerisindeki disk yapılarını kontrol ettiğimde birşeylerin ters gittiğini görüyorum. Normalde Quorum olarak atamış olduğum disk, VM ‘lerin depolanacağı yer, VM ‘lerin depolanacağı disk ise, Quorum olarak görünmekte. Bu yanlışlığı düzeltip, 500 MB ‘lık alanın Quorum, 30 GB ‘lık diğer alanın ise, VMPool ‘a ait olmasını sağlayacağız.

Resim-19
Cluster ‘ınıza sağ tıklayıp, More Actions ve Configüre Cluster Quorum Settings seçeneklerini takip edin.

Resim-20
İlgili option seçildikten sonra, Quorum ayarları default olarak bırakılır ve devam edilir.

Resim-21
Sonrasında, Quorum olması gereken 500 MB ‘lık alana sahip diski seçip, devam ediyoruz.

Resim-22
İşlemi bitirdikten sonra, Quorum konfigrasyonun değiştirildiğini görebiliyoruz. Bunu test etmek için, Failover Cluster Manager ekranı içerisinde “Storage” seçeneğini seçip, görüntüleyebilirsiniz.

Resim-23
Her iki HyperV node ‘umuzun da ortak olarak erişip, kullanabilmesi için bir adet Cluster Shared Volume (CSV) oluşturmak gerekecektir.”Enable Cluster Shared Volumes” linkine tıklayarak, sol tarafa gelmesini sağlayın.

Resim-24
Cluster Shared Volume altında, her iki HyperV node ‘unun da ortak olarak kullanacağı Storage ‘ınızı seçin. Bu storage, 30 GB olarak ayarladığımız Cluster Disk 2 olacaktır.

Resim-25
VM ‘lerimizin duracağı Storage ‘ı ayarladıktan sonra, durduğu lokasyon olarak “C:\ClusterStorage\Volume1″ olarak görünmekte. Bunun anlamı, her iki sunucununda “C:\ClusterStorage\Volume1″ altında kullanmış olduğum her VM (Virtual Machine) aslında Storage ‘ımız içerisinde depolanıyor demektir. Bundan sonraki detay, her iki node ‘a gelip, HyperV Settings içerisinde, eklenecek tüm VM disk ‘lerinin default yolunun C:\Users\Public\Documents\Hyper-V\Virtual Hard Disks ve tüm VM ‘lerin duracağın yerin C:\ProgramData\Microsoft\Windows\Hyper-V ‘den alınıp, “C:\ClusterStorage\Volume1″ olarak konfigüre edilmesi olacaktır.

Resim-26
Tüm bu HyperV ayarlarından sonra, görünüm aşağıdaki gibi olmalıdır.

Resim-27
HyperV içerisinde iki adet test amaçlı oluşturmuş olduğum Windows 7 makinem var. Bunları Failover Cluster Manager arayüzünden ekleyeceğim.
Failover Cluster Manager penceresinde, “Services and applications” sağ tıklayıp, “Configure a Service or Application” seçiyoruz.

Resim-28
Yüksek erişilebilirlik seçeneklerinden Virtual Machine ‘i seçiyoruz. HyperV ‘deki sanal makinelerimi Failover Cluster olarak ayarlayacağım için seçtim.

Resim-29
Highly Available olarak çalışacak sanal makinelerimi işaretleyip, ilerliyorum.

Resim-30
HyperV Settings konfigürasyonda herhangi bir problem yok ise aşağıdaki gibi bir görsel göreceğiz.

Resim-31
Sanal makinelerimden birini “Start virtual machines” tıklayarak başlatıyorum.

Resim-32
Her iki sanal makineme de baktığımda “Current Owner” olarak VMNode1 görünüyor. Failover Clustering yapısını test etmek için, VMNode1 HyperV makinemin Ethernet kablosunu çekiyorum.

Resim-33
Sonrasında VMNode2 HyperV sunucumda “Failover Cluster Manager” konsolunu açtığımda, neler gerçekleştiğini, sahibi olmasına rağmen VMNode1 üzerinde sanal makineye hala erişip, erişemediğimi görüyor olacağım.
Şu an tüm sanal sunucularım Vmnode1 üzerinde görünmekte.

Resim-34
VMNode1 HyperV sunucusunun ethernet kablosu test için çekildiğinde, VMNode2 HyperV sunucusunun gerekli rolü kendi üzerine alarak, sanallaştırma ortamının devamlılığını sağladığını görüyoruz.

Resim-35
Artık tüm sanal makinelerimiz VMNode1 bir sebepten dolayı erişilemez olduğu için VMNode2 üzerinde görünüyor. Böylelikle, HyperV sunucularımızın birinin başına birşey de gelse, hizmet verememeye dahi başlasa, diğer sunucu bunu anlayıp, tüm rolleri üzerine çekerek, iş sürekliliğini sağlıyor olacaktır.
Diğer bir konu ise HyperV ve Failover Cluster ile beraber kullanabileceğiniz bir özellik olan “Live Migration”. Live Migration, HyperV içerisinde kullandığınız sanal makineler, kesintiye uğramaksızın bir Node ‘dan alınıp, diğer Node ‘a taşınmasıdır. Live Migration ile sanal sunucu ve istemcileriniz çalışır durumdayken
taşıma işlemi gerçekleşir, ve herhangi bir data kaybı yaşanmaz, ya da sanal makineyi kapatmak gibi bir işlem gerektirmez.
taşıma işlemi gerçekleşir, ve herhangi bir data kaybı yaşanmaz, ya da sanal makineyi kapatmak gibi bir işlem gerektirmez.
Live Migration kullanımı için;
Failover Cluster Manager konsolu içerisinde “Services and Applications” sekmesine gelinir. Windows_7-A sanal makinemin “Current Owner” ı VMNode2 sunucu olarak görünmekte. Ben bu sunucuyu VMNode1 üzerine çalışır halde taşıyacağım.

Resim-36
Taşıyacağınız sanal makineye gelip, sağ tıkladıktan sonra “Live Migrate virtual machine to another node” içerisinden ” 1-Live Migrate To Node VMNode1″ seçeneğini seçin.

Resim-37
Migration yapılırken %yüzdesel değer olarak hangi aşamada olduğunu takip edebilirsiniz.

Resim-38
Live Migration bittikten sonra, artık Windows_7-A sanal makinesinin “Current Owner” ı VMNode1 olarak görünmekte. Bunun anlamı artık Windows_7-A sanal makinesinden VMNode1 ‘in sorumlu olmasıdır. Herhangi bir sebepten dolayı, VMNode1 hizmet verememeye başlarsa, Failover Cluster bu sanal makineleri VMNode2 üzerinden yayımlamaya başlayacaktır.

"mshowto.org sitesinden alıntıdır"
7 Aralık 2012 Cuma
FORTİGATE ÜZERİNDE HATTI 3G İLE YEDEKLEMEK
Merhaba,
Bu yazıda fortigate üzerindeki karasal hattınızı 3g ile yedeklemek için yapılması gereken işlemlerden bahsedeceğim.
Öncelikle 3g 'yi satın alırken ip sinin statik olması zorunlu bir durum değildir.ama 3g ye ilk taktığınızda ayar yapmanızın kolaylığı açısından 3g statik ip ile sabitlenmesinde fayda var.Şöyleki 3g hattınızın her sökülüp takıldığında yada her güncellemede farklı ip alması her seferinde size extradan iş yükü getireceği için ben statik ip olmasını öneriyorum.Almış olduğunuz statik ip ile ilk ayarlarını bağlanırken statik ip yi seçip ip nizi görürsünüz ve bağlandığınızda hep o ip adresi ile bağlanır.daha sonra 3g yi söküp fortigate e taktığınızda 3g hattınız pc deki gibi aynı ip yi alacaktır.
fortigate'e logon olduktan sonra "system" altında "network" altında takmış olduğunuz 3g modemin "link status" unun up olduğundan emin olunuz ve pcdeki statik ipnin aynısı olduğundan emin olunuz.

Modemi taktınız karasal hatlarınız gitti ama kendiliğinden devreye girmiyor se aşağıdaki komutları girerek aktif ediniz.
config system interface
edit modem
set distance 1
end diyip çıkıyoruz

Not: Karasal network de (wan1,wan2) policy altında yazmış olduğunuz rulları aynılarını modem içinde yazmanız gerekmekte.
Bu yazıda fortigate üzerindeki karasal hattınızı 3g ile yedeklemek için yapılması gereken işlemlerden bahsedeceğim.
Öncelikle 3g 'yi satın alırken ip sinin statik olması zorunlu bir durum değildir.ama 3g ye ilk taktığınızda ayar yapmanızın kolaylığı açısından 3g statik ip ile sabitlenmesinde fayda var.Şöyleki 3g hattınızın her sökülüp takıldığında yada her güncellemede farklı ip alması her seferinde size extradan iş yükü getireceği için ben statik ip olmasını öneriyorum.Almış olduğunuz statik ip ile ilk ayarlarını bağlanırken statik ip yi seçip ip nizi görürsünüz ve bağlandığınızda hep o ip adresi ile bağlanır.daha sonra 3g yi söküp fortigate e taktığınızda 3g hattınız pc deki gibi aynı ip yi alacaktır.
fortigate'e logon olduktan sonra "system" altında "network" altında takmış olduğunuz 3g modemin "link status" unun up olduğundan emin olunuz ve pcdeki statik ipnin aynısı olduğundan emin olunuz.

Modemi taktınız karasal hatlarınız gitti ama kendiliğinden devreye girmiyor se aşağıdaki komutları girerek aktif ediniz.
config system interface
edit modem
set distance 1
end diyip çıkıyoruz

Kaydol:
Kayıtlar (Atom)