Bu Blogda Ara

3 Ocak 2013 Perşembe

Configure SharePoint 2010 Outgoing Email to Use Hotmail, Outlook.com, or Gmail SMTP


In most of my SharePoint development environments and efforts, I generally don't need to test out any email functionality.  Occasionally there will pop up something that absolutely needs this testing and like most developers who have an isolated development environment, this can be an issue.  For me, I have a virtual machine that I host on my laptop, which is not connected to a real Active Directory or SMTP server. So how do we test email alerts for instance?  Easy, connect your environment to a public email service like Hotmail!  Here is how you do it.

First, get an email address at Hotmail (Outlook.com) or Gmail, if you don't already have one.  You can certainly use your current one but you may want to create a dummy account for these purposes.  For this post we'll be staying true to Microsoft and use Hotmail, but you can use any service that has an SMTP service available to you.

Now a couple of assumptions here:
  1. You already have SharePoint installed and configured.
  2. You have SMTP installed on IIS 6.0.  If you need to install this feature, refer to this MSDN article.
  3. Your environment is a true development environment and you can mess with the SMTP settings without any regard on the impact to other folks.
  4. You have the SMTP settings for your email service.  If you need details on a particular service check this link.
To confirm the second assumption, we can look in Server Manager and Services on the server to make sure:


Now that we have confirmed that SMTP is installed and running on the server, let's go into Internet Information Services (IIS) 6.0 Manager and configure it.


Right click on "[SMTP Virtual Server #1]" and click properties.  Again, we'll assume this is a development environment and there is only 1 SMTP server listed here, and its not being used for anything else.


In the Properties window we'll be focusing on just two tabs: "Access" and "Delivery".  Click the Access tab.


Here we'll first click the "Authentication" button and ensure the "Anonymous access" is checked.


Click OK here, and next on the "Access" tab we'll click "Connections".  In this screen we can specify which computers can access this SMTP service.  Since this is our development environment, its easiest to just set this to "All except the list below", and not provide any IPs.  If this is not a development environment, you should switch it over to "Only the list below" and provide the IP of your machine.


Click OK and back on the "Access" tab we'll click "Relay".  Just as above, we'll set this to "All except the list below", and not provide any IPs.


Click OK and you're done with the "Access" tab.  Now click on the "Delivery" tab.


On the "Delivery" tab, we'll be focusing on "Outbound Security", "Outbound connections", and "Advanced", everything else will be left at its default setting.

Click "Outbound Security".  Click "Basic Authentication" and enter your Hotmail email address and password.  Make sure you have "TLS encryption" checked as Hotmail requires this.


Click OK, back on the "Delivery" tab click the "Outbound connections" button.  Here we need to change the "TCP Port" to 587.


Click OK, and next click the "Advanced" button on the "Delivery" tab.  Here we need to update three fields: "Masquerade domain", "Fully-qualified domain name", and "Smart Host".  For the purposes of development, we can ignore the first two, kind of.  We need to put something in there, so we'll add "dev.com" and "sharepoint.dev.com".  For more info on these two items check this post at Exchangepedia.  The most important part for us is the "Smart host", which needs to be our SMTP address for Hotmail.


Click OK, and you're done with the SMTP server. 

Open a commnad line and perform and IIS reset.


With the command line still open, run ipconfig to get your local machine IP address, we'll need this in Central Administration in a moment.


Open Central Administration and click "Manage web applications".


Next click on your main Web Application, then from the "General Settings" ribbon button choose "Outgoing Email".


In the "Web Application Outgoing E-Mail Settings" modal, we'll want to change the "Outbound SMTP server" to the IP address we got from running the ipconfig command.  Again since this is a development machine, we do not need to worry about the From and Reply To address, but as you'll see when we test, these get sent over in the email.


Click OK and you're done with Central Administration.  Now, run another IIS reset!


This one may be overkill, but its nice to run this after changing something as global in Central Administration, plus its a double check in case you missed this first one.

Now let's test it!  We'll surf to a list where we'll place an alert.  For instance, we'll go to the Task list and click the "List" tab in the Ribbon.  Hover over "Alert Me" and click "Set alert on this list".


 In the modal, we can simply add an email address here to send the alerts to.  We can put in a Gmail address for instance and leave everything else as its default value.  This will ensure "Delivery Method" is email, "When to send alerts" is Immediate, and you will get an alert for any change to the list.


Now we just need to add a new item to the List.
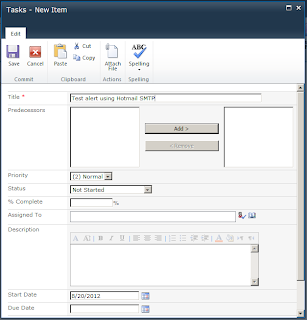


Now just wait a few minutes and if everything works appropriately, you should receive a notification alert to your Gmail account.


After that you should start receiving alerts on changes, adds, etc.


Now let's take a look at the email details.  As you can see, the From address is our Hotmail address, the reply-to is the address we saw in the "Outgoing Email Settings" in Central Administration.  The mailed-by domain is hotmail.com.


And there you go.  You now have a fairly easy way to setup SMTP service from your development environment using Hotmail or another SMTP service.

31 Aralık 2012 Pazartesi

Configuring outgoing email in SharePoint 2010 with Exchange 2010 – Step by Step Guide


Creating a Receive Connector in Exchange 2010

If you recall from my previous article when we were configuring incoming email, we created a “Send Connector” in Exchange to forward the messages to the SMTP service that we had configured and installed.  This time round we will create a “Receive Connector” in Exchange 2010.
Launch the Exchange Management Console and navigate to Server Configuration / Hub Transport / New Receive Connector.  The New Receive Connector wizard is invoked.
Enter a descriptive name and ensure “Custom” is selected as the intended use.
image thumb39 Configuring outgoing email in SharePoint 2010 with Exchange 2010   Step by Step Guide sharepoint 2010 sharepoint exchange 2010 exchange 2007 exchange
Click Next
Leave “All Available IPv4” in your Local Network settings unless you have specific Exchange IP requirements.
image thumb40 Configuring outgoing email in SharePoint 2010 with Exchange 2010   Step by Step Guide sharepoint 2010 sharepoint exchange 2010 exchange 2007 exchange
Click Next
Edit the IP address of your SharePoint 2010 server.
image thumb41 Configuring outgoing email in SharePoint 2010 with Exchange 2010   Step by Step Guide sharepoint 2010 sharepoint exchange 2010 exchange 2007 exchange
Click Next
image thumb42 Configuring outgoing email in SharePoint 2010 with Exchange 2010   Step by Step Guide sharepoint 2010 sharepoint exchange 2010 exchange 2007 exchange
Click New
You will now notice that our SharePoint 2010 Outgoing mail connector is listed with our default Exchange 2010 Receive Connectors..  image thumb43 Configuring outgoing email in SharePoint 2010 with Exchange 2010   Step by Step Guide sharepoint 2010 sharepoint exchange 2010 exchange 2007 exchange
We will now venture into its properties and make a minor permission change.  Click on the “Permission Groups” tab and select Anonymous users.
image thumb44 Configuring outgoing email in SharePoint 2010 with Exchange 2010   Step by Step Guide sharepoint 2010 sharepoint exchange 2010 exchange 2007 exchange
Click Apply.
Configuring outgoing email in SharePoint 2010 Central Administration
Launch Central Administration and navigate to System Settings / E-Mail and Test Messages / Configure outgoing e-mail settings.
image thumb45 Configuring outgoing email in SharePoint 2010 with Exchange 2010   Step by Step Guide sharepoint 2010 sharepoint exchange 2010 exchange 2007 exchange
Enter your Outbound SMTP server, i.e. your Exchange server where we created our receive connector and specify a From and Reply-to address.
image thumb46 Configuring outgoing email in SharePoint 2010 with Exchange 2010   Step by Step Guide sharepoint 2010 sharepoint exchange 2010 exchange 2007 exchange
Click OK
Testing our configuration
Lets navigate to our SharePoint 2010 web application and create an Alert .  In my example I will create an immediate alert for Announcements.
Navigate to your Announcement List and click on List Tools/List and then click on “Alert Me” located in the ribbon interface.
image thumb47 Configuring outgoing email in SharePoint 2010 with Exchange 2010   Step by Step Guide sharepoint 2010 sharepoint exchange 2010 exchange 2007 exchange
Select “Set alert on this list” and select your Alert options.  Ensure that you have “send notifications immediately” selected for testing purposes.
image thumb48 Configuring outgoing email in SharePoint 2010 with Exchange 2010   Step by Step Guide sharepoint 2010 sharepoint exchange 2010 exchange 2007 exchange
image thumb49 Configuring outgoing email in SharePoint 2010 with Exchange 2010   Step by Step Guide sharepoint 2010 sharepoint exchange 2010 exchange 2007 exchange
Click OK
You should receive your notification email that you have successfully subscribed soon after creating your alert.
image thumb50 Configuring outgoing email in SharePoint 2010 with Exchange 2010   Step by Step Guide sharepoint 2010 sharepoint exchange 2010 exchange 2007 exchange
I will now create a Test Announcement to ensure that the actual alert is delivered.
image thumb51 Configuring outgoing email in SharePoint 2010 with Exchange 2010   Step by Step Guide sharepoint 2010 sharepoint exchange 2010 exchange 2007 exchange
Alas! 5 minutes later (based on the immediate timer job definition schedule) we have received our email alert confirming that our SharePoint configuration with Exchange was successful.
image thumb52 Configuring outgoing email in SharePoint 2010 with Exchange 2010   Step by Step Guide sharepoint 2010 sharepoint exchange 2010 exchange 2007 exchange
Did you know that you can also configure outgoing email for a specific Web application?  You might want to do this if you have multiple SharePoint Web Applications hosting specific site collections and would want a different From and or Reply Address setup.
Even though we are now going to configure outgoing email for a specific Web application, you are still required to setup the default farm outgoing email settings as per the above.
Configuring outgoing email for a specific Web application in SharePoint 2010 Central Administration
Launch Central Administration / Application Management / Manage Web Applications.
Select one of your Web Applications and then select “General Settings” from the Ribbon.
image thumb53 Configuring outgoing email in SharePoint 2010 with Exchange 2010   Step by Step Guide sharepoint 2010 sharepoint exchange 2010 exchange 2007 exchange
Select “Outgoing E-Mail” from the drop down.
It will pick up your default farm settings that we entered in earlier in which you can now change the From and Reply-to address to something more specific for the selected Web application.
image thumb54 Configuring outgoing email in SharePoint 2010 with Exchange 2010   Step by Step Guide sharepoint 2010 sharepoint exchange 2010 exchange 2007 exchange
Click OK
We are done!  I hope you have found this step by step guide in configuring outgoing email in SharePoint 2010 with Exchange useful, and stay tuned as we continue our journey in configuring our SharePoint 2010 Farm.

26 Aralık 2012 Çarşamba

Windows 7 God Mod Nasıl Açılır?

  God modu aktif etmek için , bir klasör oluşturun ve adını "GodMode.{ED7BA470-8E54-465E-825C-99712043E01C}" yapmanız yeterli olacaktır.

 300’e yakın yönetim seçeneği göreceksiniz. Artık çok daha rahat bir şekilde istediğiniz yönetim aracına ulaşabilirsiniz.

25 Aralık 2012 Salı

Exchange 2007 - Export Mailbox's to PST files

 
Problem
In the days of Exchange 2000/2003 we used to use EXMerge to do this, but with Exchange 2007 (After Service Pack 1) we have the Export-Mailbox Powershell command.

Solution

As usual there are a number of hoops to jump through first,
Pre-Requisites
1. You must be on a client that is running the x32 bit management tools (Yes I'm aware x32 bit Exchange 2007 is NOT supported for production environments but it IS supported for the use of the Management tools!). For install instructions click here.
2.You must be on a machine that has Outlook 2003 (Service pack 2 or greater) installed.
If you don't tick these two box's you will see this error.
You are running on a 64-bit computer. To export to or import from a .pst file,
you must be running a 32-bit computer that has Outlook 2003 SP2 or later instal
led.
At line:1 char:1
+ <<<< Get-Mailbox -Database "Mail\Mailbox-Database" | Export-Mailbox -PSTFold
erPath \\mail\pst\
+ CategoryInfo : InvalidOperation: (:) [], RecipientTaskException
+ FullyQualifiedErrorId : C2D0E262
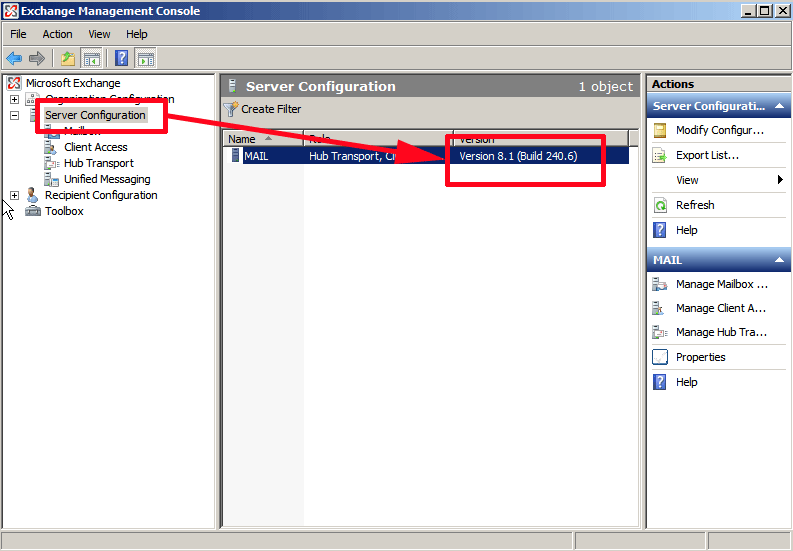
3. Your Exchange 2007 server must be at SP1 (at least).
Exchange 2007 Build Numbers = 8.1.0240.006 (SP1) or 8.2.0176.002 (SP2).
To Export a Single Users Mailbox to PST file.
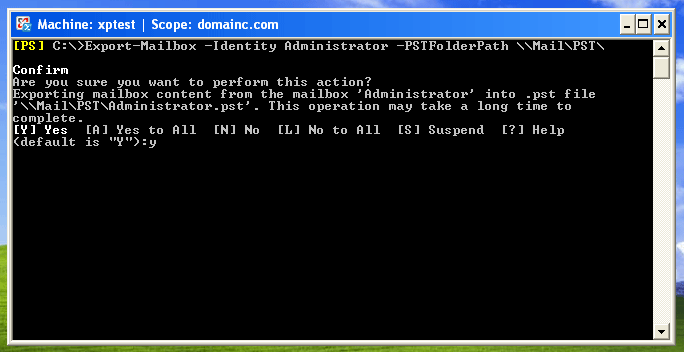
1. Use the following command,
Where Administrator is the mailbox "Alias" and \\Mail\pst is the location to host the pst file (Note: you can also use a path like c:\pst).
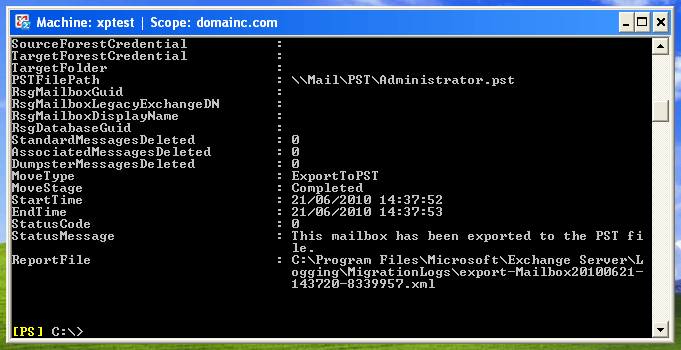
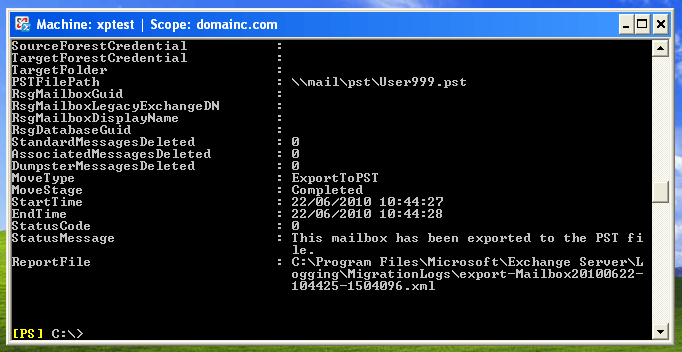
2. Press "y" to confirm and it should complete successfully.

To Export a Whole Exchange Mailbox Database to PST file.
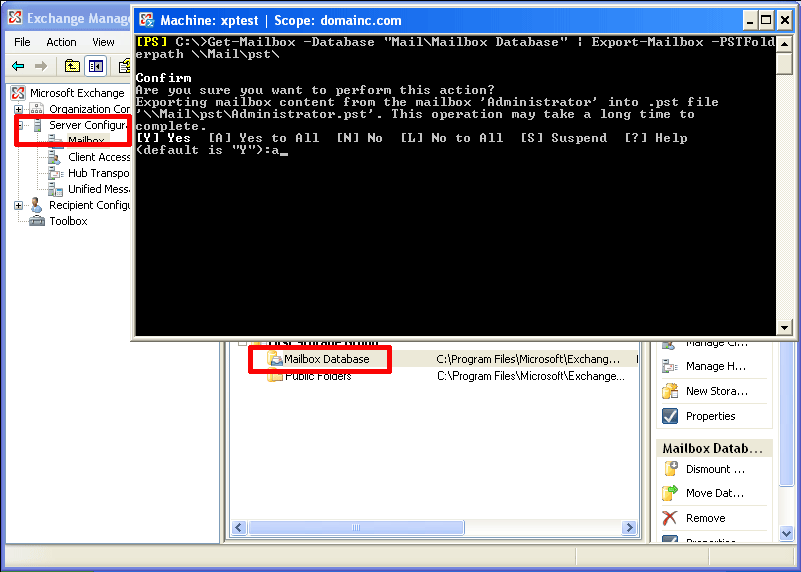
1. Use the following command,
Where "Mail" is the Exchange server name, "Mailbox Database" is the database name, and \\Mail\pst is the location to host the pst file (Note: you can also use a path like c:\pst).
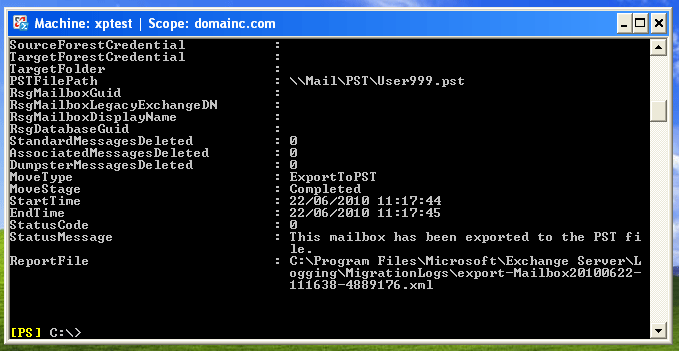
2. Press "y" to confirm and it should complete successfully.
To Export an Active Directory's OU's Users Mailboxes to PST file.
1. Use the following command,
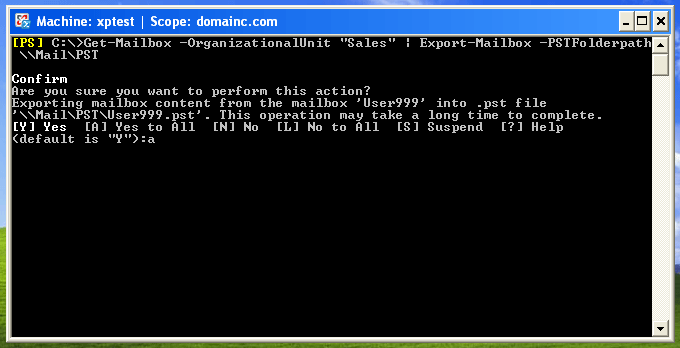
Where "Sales" is the Organisational unit, and \\Mail\pst is the location to host the pst file (Note: you can also use a path like c:\pst).
2. Press "y" to confirm and it should complete successfully.
Possible Problems and Errors
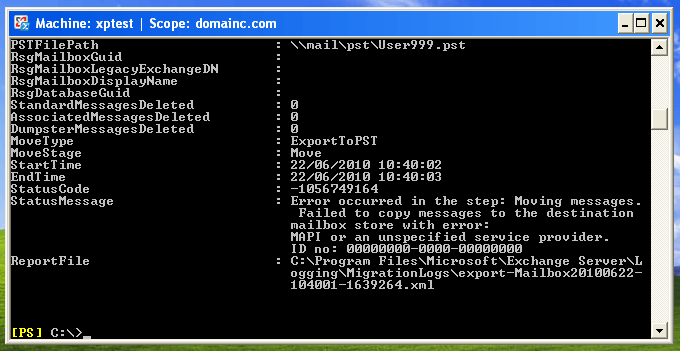
Problem 1 (MAPI or an unspecified service provider. ID no: 00000000-0000-00000000)
Error:
StatusMessage : Error occurred in the step: Moving messages.
Failed to copy messages to the destination
mailbox store with error:
MAPI or an unspecified service provider.
ID no: 00000000-0000-00000000
This is a permissions error you need to grant "Send As" permissions to the the account you are running the command under (i.e. the domain admin account).
issue the following powershell command,
Where the Exchange server name is "Mail" and the "DomainC" is the domain name.
Problem 2 (This mailbox exceeded the maximum number of corrupted items)
Error:
This mailbox exceeded the maximum number of corrupted items specified for this move mailbox operation, error code: -1056749110
The threshold for corrupted items is zero, try upping the limit by adding " -Baditemlimit 10002 to the end of the Export-Mailbox command i.e.


ExMerge Download
Exchange 2010 Bulk Import .pst Files
Exchange 2003 - Exporting Mail to .pst files with ExMerge

Exchange 2007 - Install the x32 Bit Management Tools

Exchange 2007 - Install the x32 Bit Management Tools

Problem

As you may already be aware Exchange 2007 on a x32 bit machine is NOT supported in a production environment, however there is one exception, x32 bit Exchange 2007 ISsupported for management only.

Solution

You can install these tools on XP, 2003, Vista or Windows 7. For this Example I'll use XP
Pre-Requisites
1. Install IIS: Start > run > appwiz.cpl > add remove Windows Components > Internet Information Services(IIS) > Next.
2. Download and install .Net Version 2.0
3. Download and Install .Net SP1
4. Download and Install MMC 3.0
5. Download and Install Powershell
Install the Exchange 2007 x32 Management Tools
1. Download the Management Tools.
2. Run the .exe file and extract the files to a folder > From that folder run setup.exe
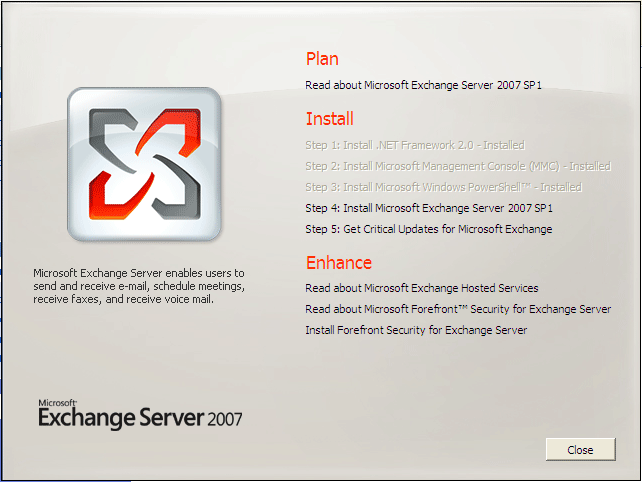
3. Select "Step 4 Install Microsoft Exchange Server 2007 SP1"
5. At the intro page > Next > Tick "I Accept..." > Next > Next >
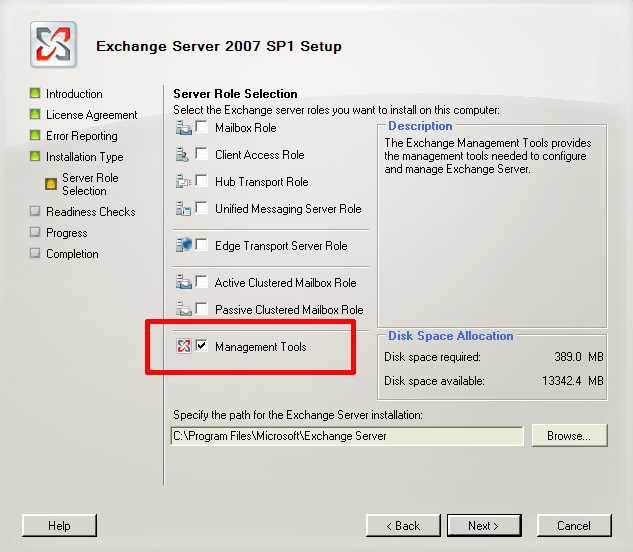
6. Select "Custom Exchange Server Installation" > Next > Select Management Tools > Next.
7. Exchange will perform its readiness checks > Next > Finish.
8. Exchange Management Tools will launch automatically.

18 Aralık 2012 Salı

Varsayılan Gizli paylaşımların iptali "$"


Server veya client üzerinde bulunan Administrative Shares lerin kapatılması veya açılması işlemi için aşağıdaki register işlemini kullanabilirsiniz.
Servers
For NT 4.0/W2K/Windows Server 2003s, the change is:
Hive: HKEY_LOCAL_MACHINE Key: SYSTEM\CurrentControlSet\Services\LanManServer\Parameters Name: AutoShareServer Data Type: REG_DWORD Value: 0
Note: A reboot is necessary for this to take effect.
Workstations
For NT 4.0 Workstation/W2K Pro/XP Pro, the change is:
Hive: HKEY_LOCAL_MACHINE Key: SYSTEM\CurrentControlSet\Services\LanManServer\Parameters Name: AutoShareWks Data Type: REG_DWORD Value: 0
Note: A reboot is necessary for this to take effect

Kullanılmayan Computer Account’ların silinmesi – SCCM Üzerindeki Eski Bilgisayar Hesaplarının Silinmesi -Delete Old Computers


Merhaba,
Active Directory üzerinde bulunan ve 90 gündür oturum açılmayan bilgisayarların listesini alabilir disable edebilir veya silebilirsiniz. Bu uygulamayı indirebilmek için burayı tıklayabilirsiniz.
Komutu kullanabilmeniz için command promt ekranında aşağıdaki gibi çalıştırabilirsiniz.
####
C:\Users\xxxxx\Desktop>OldCmp.exe /report
OldCmp V01.05.00cpp Joe Richards (joe@joeware.net) December 2004
Processed at ISTFLY-ADC-02.mustafakasikci.com
Default Naming Context: DC=mustafakasikci,DC=com
Search completed…
Creating Report File: oldcmp.20120616-114150.htm
Command completed successfully
###


Komutun diğer özellikleri aşağıdaki gibidir;

-report Write report of objects
-disable Disable objects
-delete Delete objects
Delete will only work on disabled objects.
-move Move objects, use with newparent.
-newparent xx DN for a new parent to move objects to. Can be used
with move or disable options.
-stamp When used with delete w/ expire account as well
The idea being you can see the date it was done then.
-safety x How many objects to modify. (Default 10)
With this set, stops updating after x mods.
I did this because it is very easy to hurt yourself.
-unsafe Update ALL of the objects identified.
-forreal REALLY MAKE THE MODS, this is the final safety.
-h host Host to use. (Default is to autofind DC)
-s scope Scope of search. OneLevel, Subtree. (Default Subtree)
-b basedn RFC 1779 DN to start search at (Default domain root)
-users Work on users instead of computers.
-realage Filters out computers/users that have not set their
password (or haven’t logged on when llts specified).
-f filter RFC 2254 LDAP filter (Default is confusing icon smile Kullanılmayan Computer Account’ların silinmesi   SCCM Üzerindeki Eski Bilgisayar Hesaplarının Silinmesi  Delete Old Computers
-af addon RFC 2254 LDAP filter to add to builtin filter
-excldn xx Exclude objects with given string in DN. Multiple
strings delimted by semi-colon (;).
-excldndelim x Specify a delimiter for -excldn, default is (;).
-t xxx Timeout value in seconds. (Default 300 seconds)
-bit Bitwise operator filter conversion enable
:AND:= converts to :1.2.840.113556.1.4.803:=
:OR:= converts to :1.2.840.113556.1.4.804:=
-ps size Page size. (Default 100)
-nodc Exclude DCs from queries
-norefer No LDAP referrals
-onlydisabled Only disabled accounts (Default All)
-age x Min Days Old for password age. (Default 90 days)
-maxage x Max Days Old for password age. (Default Infinity)
-llts If K3 domain in Domain Functional mode uses
lastLogonTimeStamp instead of pwdLastSet for age options.
-format x Report Format (Default HTML)
CSV – Delimited Text
HTML – Standard HTML
DHTML – Dynamic HTML (IE Only)
-sh Will autodisplay HTM/HTML/TXT files after run
-file x File to write to. (Default oldcmp-<DATE>.htm
-append Append to file instead of overwrite
-delim x Delimiter for CSV. (Default icon wink Kullanılmayan Computer Account’ların silinmesi   SCCM Üzerindeki Eski Bilgisayar Hesaplarının Silinmesi  Delete Old Computers
Specify TAB for \t (tab character)
-nolc Do not normalize machine names to lc – RAW Case
-nohtmlheader Don’t insert base HTML (title, body…)
-sort x Sort by various fields.
-rsort x Reverse Sort by various fields.
cn = name
pwage = password age
age = object age
OS = operating system version
LLTS = lastLogonTimestamp
Ex1:
oldcmp /?
Display this help
Ex2a:
oldcmp -report
Generate html report of all cmpaccs > 90 days old
Ex2a:
oldcmp -report -format dhtml -sh
Generate dhtml report of all cmpaccs > 90 days old
Open the report after generating it
Ex2c:
oldcmp -report -format csv
Generate csv report of all cmpaccs > 90 days old
Ex3a:
oldcmp -report -age 0
Generate html report of all cmpaccs
Ex3b:
oldcmp -report -age 0 -format csv -delim tab
Generate csv (tab delimited) report of all cmpaccs
Ex4:
oldcmp -report -age 0 -onlydisabled
Generate html report of all disabled cmpaccs
Ex5:
oldcmp -report -age 0 -onlydisabled -sort cn
Generate html report of all disabled cmpaccs, sort on name
Ex6:
oldcmp -delete -age 0 -onlydisabled
Generate html report of all disabled cmpaccs, sort on pwage
Will show you what it would try to delete. Only up to 10.
Ex7:
oldcmp -delete -age 0 -onlydisabled -safety 100
Generate html report of all disabled cmpaccs, sort on pwage
Will show you what it would try to delete. Only up to 100.
Ex8:
oldcmp -delete -age 0 -onlydisabled -unsafe
Generate html report of all disabled cmpaccs, sort on pwage
Will show you what it would try to delete. All cmpaccs.
Ex9:
oldcmp -delete -age 0 -onlydisabled -unsafe -forreal
Generate html report of all disabled cmpaccs, sort on pwage
Will REALLY DELETE all accounts identified.
Ex10:
oldcmp -disable -unsafe -forreal
Generate html report of all cmpaccs > 90 days, sort on pwage
Will REALLY DISABLE all accounts identified.
Ex11:
oldcmp -report -sort OS -age 0 -maxage 60
Generate html report of all cmpaccs still valid, sort on OS
Ex12:
oldcmp -report -af “(operatingsystem=Windows XP Professional)” -onlydisabled
-age 0
Generate html report of all disabled Windows XP machines
Ex13:
oldcmp -report -b ou=mycmps,dc=domain,dc=com
Generate html report of cmpaccs >90 days in specified OU

Note: This tool is VERY POWERFUL and could be VERY DANGEROUS!
I put a lot of safety locks in it ON PURPOSE!!!
This thing can be used for quite a bit of different computer
auditing if you know what you are doing.
Thanks to many of the members of the activedir.org listserv. Lots
of good feedback came in from them when they betatested this tool
for me. Special thanks to Ryan Durant and Bob Free for helping me
with the DHTML option. It wouldn’t have made it this soon without
that needed assistance. Thanks everyone!
This software is Freeware. Use it as you wish at your own risk.
If you have improvement ideas, bugs, or just wish to say Hi, I
receive email 24×7 and read it in a semi-regular timeframe.
You can usually find me at joe@joeware.net